Pages

Pages

Saturday, February 21, 2015

We made Charcoal

This post contains Affiliate Links.

     Many years ago, an older gentleman told my husband you could make your own charcoal by taking the larger embers from a fire and dousing them in water. This has always stuck in my head and I have wanted to try it for many years. Alternative cooking means is a topic that is always on the back of my mind. 
     A couple of months ago, I was getting out the ash from around some large embers. I started thinking about the story of the older gentleman making his own charcoal from large embers doused in water and air dried. I called Zoey into the garage and told her the story. "We can make BBQ charcoal?" she asked. 
"Maybe," I said. 
"Let's do it!" And, so we did. 

     I got a large coffee can, filled it with water, scooped out some embers and dropped them into the can. We stood back and watched the water boil and steam. When it finished, we dropped more into it. When the can was filled, Zoey held the front door open while I carried the can outside. It was surprisingly cool. I expected the can that just had boiling water in it to be a lot hotter to the touch. 


     I drained the water out as best I could. Some of the tinier pieces fell out, but I did not worry about it. My coffee can has a lip on it and I think that helped to drain the wet charcoal with out all of the pieces trying to come out. We brought the can back into the garage and Zoey laid out newspaper to lay the wet charcoal out on. 
     
     It took about 4 days for it to dry. We did not use it immediately though. One coffee can of charcoal is not a lot. We did several batches over the next few weeks. Anytime our fire had produced a fair amount of large embers we would get the coffee can back out and start the process over. 
     When I felt we had enough, I bought a steak to cook on it. What better way to test the flavor charcoal gives to meat than to cook a steak on it. However, as my luck would have it, we were not home when the day arrived to cook our steak on our home made charcoal. I was supposed to be off after 12 but ended up having to stay until 4. Since my hubby has to be in bed by 5:30 and eats at 2 p.m., he had to go ahead and cook it without Zoey and I. We might have come home to cold steak and no blogging pictures, but it still tasted fantastic! There was none of the 'campfire' taste you get from using old burning wood like you get when you are camping. (I do not like that taste!) 
     It was another month and a few more batches of charcoal making that we got to be here to grill up some pork chops. My husband started the charcoal with a bit of lighter fluid. It burned evenly and easily. Oh, what a beautiful sight to see! Now we will be making charcoal instead of buying it! 

     If you plan on making your own charcoal, please use extreme caution. Embers of a fire are extremely hot and can cause unexpected fires. Just because I found the can to be cooler than expected, does not mean you should just grab it up. Make sure the coal is completely extinguished before placing on any surface to prevent fires. Please exercise extreme caution and common sense before trying anything you see on my blog or any thing else on the web. 

     Do your own research! I hear there are different ways to make larger batches of coal.  


Disclosure: I am Amazon Affiliate and may receive a small compensation for including links on my blog. Buying through my links is not necessary, just appreciated. Amazon does not charge extra for linked items recommended by their affiliates.  I only recommend products that I use and trust OR plan on using in the future. Please buy responsibly and do your own product research before buying anything online. 

Monday, February 16, 2015

Catching Rain

This post contains Affiliate Links.

     Once upon a time, I spent a fortune for a Shade Canopy so I could set up at fairs and arts & crafts events for my sewing and embroidery business. It was a good shade canopy and served me well. Then one weekend, I went out to an event in early March. It was cold and windy. The children and I sat in our truck, no customers had come for the hour that we were there. We were FROZEN and miserable but we stayed because the director of the event promised a big turn out as soon as the sun came out. (It was 8 a.m.) Final straw happened when a huge gust of wind flipped up my Shade Canopy, spun it around in the air, and slammed it on the truck next to me. It bent one of it's legs to the point that it could not be used anymore. Luckily, the vendors in the truck it landed on were very understanding and helped me wrangle it back together enough to pack and and transport home. We were defeated... 
     Since that day, I have tried to come up with ideas to use my 'slightly bent legged' canopy. It cost a small fortune and was in really good shape otherwise. Over the summer, we popped it up to shade our sugar snap peas from the harsh afternoon sun. It was a little off looking; it does not open fully because the bent portion is above the side post that pops it into place. It worked though. 
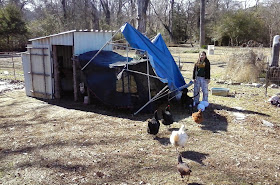
     This winter, the tarp that goes over the open end of the chicken coop kept lifting up and allowing wind into the chicken coop. They have a large nesting area that is completely enclosed, but, I still wanted to keep the cold wind out. One day, Zoey helped me lift the canopy up and over the coop. The legs of the canopy fit perfectly around the screened in coop, holding the tarp nice and snug. People that have come over have laughed at me, but I do not care cause that sucker WORKS! :D 
     A few weeks back, it rained. Suddenly the canopy's tarp was weighted down with all of the rain it had collected. It also became more comical looking. BUT, it also gave Zoey an idea! 
     She came running in one cold morning and said, "Mom, I need some empty gallons!" 
"Why?"
"I'm going to collect the rain!"
     I followed her outside with a few empty water jugs to see what her excitement was about. The top of the shade canopy had collected the rain from the night before and formed a large pouch. She had already pulled out a big chunk of ice that had formed on top of it. Then she explained she wanted to fill up our empty water jugs with the rain water so we could water our house plants with it. Zoey said, "It will save us money!" Smart kid. 
     Although the water was near freezing temps, she filled all 5 gallons up by hand. (You have to love her working attire of pajama bottoms and Croc shoes! It's a homeschool thing :D )


      She has suggested we put in a water catchment system. I would love to water our summer garden with the rain from winter and spring, but right now it is just not possible. Our house does not have gutters, and our only source of catching rain is my shade canopy. I am very happy to have finally found a good use for it!  Tonight it is raining. We have saved up TONS of empty gallon jugs to use. 

     So you have an easy and inexpensive water catchment system? We would love to see what others are doing! 


Disclosure: I am Amazon Affiliate and may receive a small compensation for including links on my blog. Buying through my links is not necessary, just appreciated. Amazon does not charge extra for linked items recommended by their affiliates.  I only recommend products that I use and trust OR plan on using in the future. Please buy responsibly and do your own product research before buying anything online. 

Wednesday, February 11, 2015

Don't Count Your Chickens...

This post has Affiliate Links.


Don't Count Your Chickens Until They Hatch

     I never really understood what that meant until this week. Due to a series of unfortunate events, we will have no chicks from our eggs in this experimental hatching. While extremely sad, we realize this is a part of a learning experiment and we are hoping our remaining 5 eggs will have a better outcome. 

Let's Recap The Last 3 Weeks-

  • Week 1- We used the flashlight 'Candling' method to see into the eggs. Since most of the eggs had dark thick shells, it was hard to tell if what we were seeing. At this stage, you mainly see the veins of the fertile eggs and possibly a dark speck that is the chick embryo. However, we did get a lovely little video of a chick moving around inside of one of the eggs. You can see the video HERE
  • Week 2- While we started out with 3 of our own eggs and 5 from our neighbor, we realized after Water Candling at Week 2 that 3 of the eggs were not going to hatch. Two were ours and they had blood rings of an early death. One from Bree turned out to be infertile. We were very sad to loose Prissy's egg. If you remember, she is our FFA hen that was not supposed to live past a few months, lay eggs, or mate. We also lost one of our Jersey Giant eggs as well. 
  • Week 3- On the eve of day 18, we water candled again. All of the chicks wobbled in the cup and everything seemed to be right on track for LOCKDOWN. However, we had an over achiever decide he wanted to cheep on day 19 and start to pip on day 20. Unfortunately, Zoey and I had to be at work that day. Some friends came over while we were gone. Thinking the chick was in distress, someone (not naming any names) opened the incubator a couple of times to help. By the time I rushed home from work, Bree's blu egg had hatched and there was no cheeping from any of the other eggs. We waited anxiously on day 21 for any signs of hatching. On day 22, we were still hopeful but at the same time, we knew it was very doubtful they would hatch. On day 23, we water candled again just to make sure they were gone. No sounds, no movement, no hatching, no baby chicks for us. Zoey took it like a trooper. 
    The 3 eggs that did not hatch. 
    

So How Is The Lone Ranger?

     He is doing very well! After nearly falling in love with this little thing, we sent him over to be with our neighbor. It was her egg after all. She would have let us keep it, but Zoey decided it needed to go live with Bree. My daughter is waiting patiently for February 21st for our next batch of eggs to hatch. I have taken off of work on Friday, the 20th so that we will be here for the hatching. We hope to catch it on video. 
     ALSO, our local farm and ranch stores, (3 of them) will have live chicks on Valentine's weekend. Will we be buying chickens even though we are hatching them? Well, heck ya! :D We hope to get some different colored eggs in our flock. Some of THESE would be lovely. Zoey would like a Polish hen; she likes the feathers on top of their heads. 

Here are some pics of the Lone Ranger's hatching and first days. 


   There is still one egg from the first batch that is due today. It is one of Bree's Bantam chicks. There has been no cheeping or pipping coming from it this morning. I have not given up hope, but after loosing so many, I will not be counting this chicken before it hatches. 

So as always, stay tuned and wish us luck!


Disclosure: I am Amazon Affiliate and may receive a small compensation for including links on my blog. Buying through my links is not necessary, just appreciated. Amazon does not charge extra for linked items recommended by their affiliates.  I only recommend products that I use and trust OR plan on using in the future. Please buy responsibly and do your own product research before buying anything online. 

Wednesday, February 4, 2015

OPERATION: Chicken Hatch- Water Candling Week 2

This post contains Affiliate Links.
 

     It is almost that time! The magic of watching eggs hatch before your eyes! Our Amazingly, Awesome Neighbor Bree had shown me a video on 'Water Candling Eggs' and we decided it was something we were going to do when our eggs were close to hatching time. This is not something you want to try earlier in the egg development. 1. They might not be big enough to move the egg. 2. You do not want to remove the 'bloom' before it is time.
      'Bloom' is a natural coating on the outside of a fresh laid egg. Egg shells are porous. The bloom keeps bacteria from getting into the egg and helps lock the egg's moisture in. Eggs you eat that have not been washed until time to eat are fresher and the bloom also allows for your eggs to be stored for longer. 
     In an incubator, the bloom is naturally removed with the humidity. This allows air to enter into the egg and provides some of the air the chicks breathe before hatching. Our eggs are due to hatch in 3 days. They no longer need the bloom coating and they are large enough to wobble their egg. 

     Here are the photos from our first water candling. To water candle, you get a short glass of warm water and gently place the egg inside. It will float based on the size of the air sack inside of the egg. After the water settles, you should be able to see the egg move in the water as the baby chick moves in the egg. My phone did not take a good video so we waited a few days and re-candled the eggs using Zoey's tablet


     These eggs did not wobble. We candled them using an LED flashlight. Thanks to The Chicken Chick, we recognized the eggs had blood rings in them. It is a clear indicator that the embryo died. We were very sad to see that we would not be having a baby chick from our beloved Prissy in this batch. We also lost one of our Jersey Giant chicks and one from our Amazingly Awesome Neighbor, Bree. With this batch, we only have one egg left to hatch. Bree has four. 


     Here is our new eggs into incubator on 1/30. Unfortunately, our Amazingly Awesome Neighbor, Bree, could not bring her eggs over until the next day. She only brought 5, because, she decided she was not sure she wanted too many of half standard/half Bantam chickens. The only rooster she has is a Bantie. 


Homeschooling The Well Prepared Child Presents:
Water Candling Eggs!

     Now that it is day 18, our incubator will be on lock down. Tonight we will remove them from the turner, add a little more water and wait for the magic to happen! We hope to catch the chicks hatching on video. Wish us luck! 


Disclosure: I am Amazon Affiliate and may receive a small compensation for including links on my blog. Buying through my links is not necessary, just appreciated. Amazon does not charge extra for linked items recommended by their affiliates.  I only recommend products that I use and trust OR plan on using in the future. Please buy responsibly and do your own product research before buying anything online.