Enter your email address:

Delivered by FeedBurner

Homeschooling The Well Prepared Child: science
Showing posts with label science. Show all posts

Friday, January 16, 2015

Update: Growing Tators In Buckets

This post contains Affiliate Links.

     Growing Tators In Buckets was first published on December 29th. Just 2 days before I published Our Top 10 Posts of 2014. In just 2 short weeks, the post is now #3 on my top 10 views of all time. AMAZING! Thank you to everyone that has shared, commented, tweeted, pinned and loved our Tators post. However, it was not just the views that has grown at an alarming rate, the tators have as well! 

     Now if you remember, our potatoes started out like this. They were just in a box, under my kitchen cabinet, waiting to be planted in the spring. Or so I thought... I guess they had a different idea of when they should be planted. 

     January 8th was when we first noticed we were getting stems growing up. Previous to that, we would uncover the potatoes just to make sure they were still in there. It seemed to take forever for the little stems to show up. Then, they started to grow fast! 

     Due to weather and my job hours, we were unable to cover them up on. It was a few days later that we added 3 inches of compost soil. They were already starting to form leaves. I'm sure after we watered them, the depth was not still 3 inches, but they were still covered.  


That following Monday, we looked again. One side of the bucket was already growing from up out of the soil. The other side was still growing, just not as fast. We decided not to add any more soil to the lower side of the bucket. Zoey added 3 more inches of soil to the higher side. 


     Now here it is January 14th, and they have already grown out of the new soil. It is so amazing to watch them grow! The lower side is starting to catch up, but the high side still towers over them. Unfortunately, we have to wait till Saturday to cover them again. I work from sun up to sundown at my job, but just the 2 days a week. 

   Honestly, I did not think the potatoes plants would grow this big, this fast. I thought it would at least take until spring to get to the top of the bucket. At this rate, I think we are looking at another 2-3 weeks. That might be a problem. While I have said all along, plants under the soil only need the sun for warmth, once they get to the top, they will definitely need the suns rays to survive. It is the dead of winter and I do not think they will survive indoors. At this time, we do not have any indoor growing lights and I am afraid they will not grow well in the garage with just the florescent lights over head. I may need to invest in a grow light soon... Not really wanting to grow using electricity in winter, but man, this is so exciting! 

     Zoey has been keeping up with the growth in her Science Journal. Every few days she gets out her spiral notebook and draws what she sees in the bucket. Then, she writes a small paragraph about what it is doing, or what we have done. This brings science and writing together. (AND a bit of art! ;) ) If I had really thought about it, we could have created a little chart to keep up with how fast it has grown in so many days. Also, I think it would have been a really good idea to have written an inch line from the bottom of the bucket to the top of it in a Sharpie Marker or some other permanent marking tool. That would of been fantastic! I just was not expecting this to go this well! 

Want to see the original post?


So what do you think? 
Will they actually grow some spuds?   


Disclosure: I am Amazon Affiliate and may receive a small compensation for including links on my blog. Buying through my links is not necessary, just appreciated. Amazon does not charge extra for linked items recommended by their affiliates.  I only recommend products that I use and trust OR plan on using in the future. Please buy responsibly and do your own product research before buying anything online. 

Monday, July 7, 2014

Our Favorite FREE sites for Lessons and Learning

This post does not contain any Affiliate Links.


Here is a list of sites I get a lot of my ideas from, or at least the technical aspect from. :) I will add to and update from time to time so keep checking back or bookmark this page. 


The Science of Gardening:

Science Net Links

E How

Nutrients For Life. Org

Can Teach


Free Lesson Plans and Ideas, General:

Learning Treasures

MPM Ideas

Teachers Pay Teachers (Just put 'FREE' in the search bar)

Education.com

NeoK12 (Is not longer free but still has a lot of great FREE videos to go along with your themes.)

Enchanted Learning

BrainPop and BrainPopJr have lots of free stuff to watch and do, but are also a paid site. 


Free Learning game sites. Who doesn't love to learn with out knowing? 

ABCYa

Arcademics.com

Animal Jam (National Geographic)


I am in no way affiliated with or paid by any of these websites or pages. They are just a round up of my 'go to' sources for activities and work sheets! Enjoy!


Tuesday, June 24, 2014

Portfolios and Journals

  
This post contains Affiliate Links

        I have received a lot of messages asking to hear more about my daughter's portfolio and journal for science. She has a journal and folder for every subject, but, these two are our favorites. Everything plant related we have studied goes into them, although, her science spiral is for everything science related. Let us take a look inside!


 She was very proud of her cover artwork.


Diagram from www.uic.edu
We talked about the parts of a tomato plant and them drew her own plant on a separate piece of paper. Then she labeled them with help of the first photo. Both papers went in to her Plant Portfolio.


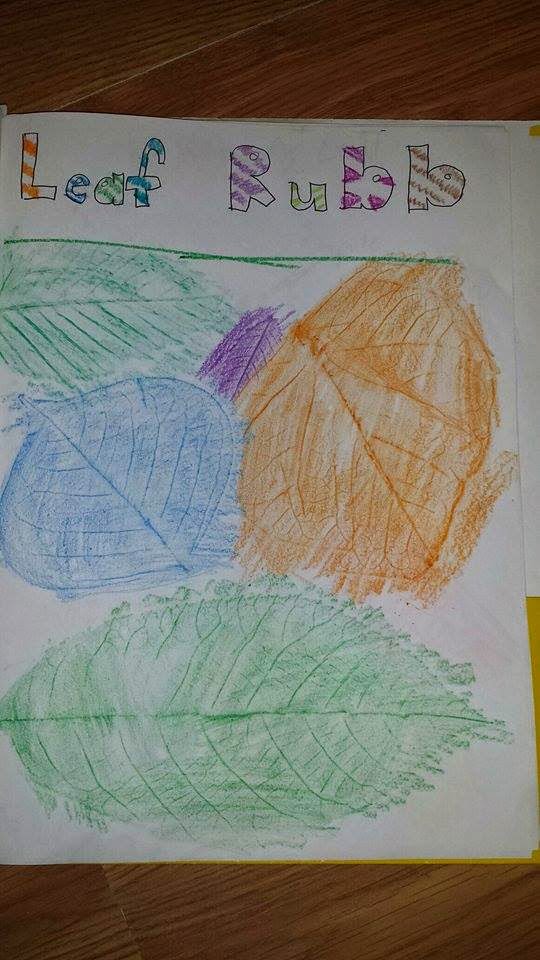
After a nature walk, she came in and made leaf rubbings to study the different types of veins each leaf had. 

She chose the leaf she liked best, made a leaf rubbing of it, and then labeled the parts of the leaves.

When we planted our tomato plants, she measured then every other day and then wrote her findings on the Excel paper she created. 


     Also in her portfolio are the different work sheets and printable information she learned about.
Information on plants from 'Instructor Web'
A Quiz from NeoK12 she printed out. 
    
   Inside of her 'Science Notebook' are journaling questions, written notes from books we read from the library that she did not want to forget, recorded observations and drawings. For example, when we were doing our 'Winter Tomato' experiment. Not only did she put her measurements in the Excel table, she also drew and wrote about the progress and growth of the plant. 


Water Filtration Project


 Learning about Container Gardens


How to Grow a Garden

   Portfolios and Notebooks are not just for science. They are great when you are working on a 'Theme" study unit and are pulling from various sources. Math, literature, reading, and geography can also have their own spiral notebook and folder.

At the beginning of the school season, our local Big Box Store has these and other supplies for super cheap! Stock up!


Disclosure: I am Amazon Affiliate and may receive a small compensation for including links on my blog. Buying through my links is not necessary, just appreciated. Amazon does not charge extra for linked items recommended by their affiliates.  I only recommend products that I use and trust OR plan on using in the future. Please buy responsibly and do your own product research before buying anything online. 

Sunday, June 22, 2014

Parts Of A Plant- The Stem

This post contains Affiliate Links.

    If you are going to garden, you need to know about the parts of a plant and their functions. This lesson is on the function of plant stems. 


Celery Stalk Experiment

What you will need:

  • 1 stalk of celery, cut diagonally at the bottom
  • 1 Tall cup filled half full of water
  • Food coloring of your choice (I asked her to choose what color she thought would show up the best against the green of the plant. She chose red)
  • Peanut Butter (for a snack later, this is optional :) )


Step 1: Choose your piece of celery for your experiment. Cut diagonally along the bottom. Please supervise your child closely if they are cutting it themselves. 


Step 2: Add enough food coloring into your cup to turn the water a nice dark color. Put the stalk inside the cup, cut side down and the leaf side up.

Step 3:   Allow your celery to sit a while to give the stalk time to soak in and pull the colored water through it's veins. We let ours sit for 2 days to get the maximum absorption. Can you see the red veins in the celery?  
Step 5: Allow your child to dissect their celery stalks and make their own inferences. It is not so appetizing at this point. She really enjoyed taking it apart though, and she was able to see what parts were the veins and how they traveled. 
Step 5: Have a snack! My daughter decided she did not like celery and peanut butter. She got out the ranch dressing and ate hers with it. I, on the other hand, almost took down half a jar of peanut butter with my celery! OOOPS! (If you or someone you are doing this lesson with are allergic to peanut butter, try some cream cheese on it! Do not eat peanut butter if you have a peanut allergy.)
     Now I suppose you are wondering how to make this lesson less preschool/lower grade and more of a higher level of thinking lesson. It's easy! The 'veins' in the celery actually have really cool names and their own functions. Xylem and phloem are the vascular tissues found in celery and other plants that work just like veins do in our bodies. Also in the function of transporting water and nutrients throughout the plant are more scientific terms like: Translocation, Adhesion, Cohesion, Transpiration and Stomata. Now the best way I have found to get children to really understand these terms and functions is to have them look them up themselves. 

Other brainstorming activities: 
  • Find other plants you can do this same experiment on like roses and carnations. If you use a white flower, you can change the colors of the petals. 
  • Start a 'Scrap Garden' from the end of your celery plant. 
    • Draw the end of the celery and label the parts of the stem. 
    • If your child does not have one already, start a spiral notebook to be their "Scientific Discoveries" journal. We use ours a lot to journal the progress of our plants and science experiments. It is also a place for her to reflect upon the activities we have done. 

    • We also have portfolios that we put our loose papers and work sheets in. She also puts in any good info she finds and prints from the web. My daughter makes her own graphs and charts on MS Excel to go with our lessons. Those graphs go in here after she fills them out during our experiments. Want to know more about using portfolios and notebooks? Click HERE.

    • Go to the library and check out books about gardening with kids and parts of a plant. 
    • Youtube has a lot of great videos on the subject as well. 

    Check out our other 'Parts of a Plant' lessons in this series! 
    Parts Of A Plant: Seeds
    Parts Of A Plant: Tendrils


    (And if I can figure out how to get the worksheets we created to change formats for the different computer, we will post those too! :)


    In the meantime, here are some websites that have great information on this topic! (These are NOT affiliate links)


    Disclosure: I am Amazon Affiliate and may receive a small compensation for including links on my blog. Buying through my links is not necessary, just appreciated. Amazon does not charge extra for linked items recommended by their affiliates.  I only recommend products that I use and trust OR plan on using in the future. Please buy responsibly and do your own product research before buying anything online. 

    Saturday, June 14, 2014

    Water Filtration

         This post contains affiliate links. 


         Every Survivalist/Prepper should know how to filter out muddy water to be drinkable! My daughter wanted to see if she could take water from the mud puddle and filter it. First we youtubed some videos and researched 'Water Filtration For Kids' and found lots of good info.  Then she went outside and got water from the mud puddle she had splashed in all day. This is what it looked like:


         Not a very pretty sight! I asked my daughter what she thought we should do next. She wanted to see what it would look like if we waited. Her theory was if our soil samples from the Soil Sample Project settled and cleared the water a little, than maybe the same thing would happen if we left the muddy water sit for a little while. So we waited. 


          After just one hour it settled quite a bit, but, we wanted to see if it would clear up on its own if we let it sit overnight.

         It did not completely clear. She saw a slight separation in the jar about mid way.  I asked her what she wanted to do next, and she decided to wait. 

          In 48 hours the super fine dirt had settled in the bottom of the jar on top of the other dirt. At this time, my daughter got out her science journal and documented what she observed. We decided we would wait to see what would happen next. Unfortunately, we had to make a sudden trip out of town and had to leave our project where it sat in the bathroom window.  My daughter had worried about her project the whole time, 'Momma, it was already starting to get green!' We came back 2 days later to this...


    And that really does not look to bad until we got close up and really looked... 

     You really can't tell by this photo, but the film actually looked... FLUFFY....

    and what the heck was this? 

    She decided to filter it anyways. 

    The first filtration she tried was to pour 
    the water through coffee filters alone. 

    This is what was removed.


    This is what she ended up with. Not too bad! :)

         She looked at me and said, 'But can we drink it?' I didn't know! But I highly doubted it! So back to Google we went to do some research. We found out you need something to kill out the tiny micro organisms and bacteria that might be living in it. We decided to try the rock, sand, and activated charcoal method. She cut a 2 liter bottle in half and placed the top of the bottle upside down and into the lower half. Then she placed coffee filters into the bottom and layered the charcoal, rocks and sand. 


         It seemed the more we filtered it, the more yellow it became. The one on the left is our filtered water. The one on the right is water from our tap. HUGE difference in color. AND it smelled like pee! Why would it smell like pee? We consulted a group I am in on facebook and they asked what kind of charcoal we used. Well.... apparently all charcoals are not the same, and the charcoal we were supposed to use was activated charcoal, not Daddy's charcoal he makes us grilled pork chops with. Whoops! It was suggested we use bleach to kill out any microorganisms and bacteria. 

    Now that is better! We did not try to drink it. The whole pee smell thing completely ruined it for us. (and honestly, I was not sure how safe it would be. Can't risk my baby's life in the pursuit of survival.) 

    SIDE NOTES:   More research is being done to figure out how to be able to take puddle water and make it drinkable. That was the whole point in the first place! An observation my daughter made was we ended up with a fraction of the water we started with.  She was amazed at the amount of water that was lost in the process and came to the conclusion that the coffee filters soaked up too much of the water to be useful. Did you notice my daughter was not in the pictures doing the project? That is because she asked if she could 'document' the project on her own this time. :) My baby is a researcher and knows to document! 

    Love this topic and want to see a little of what we researched? 


    Preppedandprepared.com is no longer available, but you can still find PK on her own You Tube channel. 


    Disclosure: I am Amazon Affiliate and may receive a small compensation for including links on my blog. Buying through my links is not necessary, just appreciated. Amazon does not charge extra for linked items recommended by their affiliates.  I only recommend products that I use and trust OR plan on using in the future. Please buy responsibly and do your own product research before buying anything online.