Enter your email address:

Delivered by FeedBurner

Homeschooling The Well Prepared Child: fail
Showing posts with label fail. Show all posts

Monday, February 6, 2017

A Glimmer of Hope

This post may contain Affiliate Links.


Our beautiful Avocado Tree died this year. We are devastated. 3 years we have babied this plant. Bringing it inside during winter, making sure it did not get too much afternoon sun in the summer. It grew big, healthy and strong. Until we brought it in for the cold weather this year.
We refused to give up hope.. Until the top little limbs grew dry and snapped easily. Our little tree was lost. Refusing to be defeated, we decided to try again. Zoey began saving seeds from avocados. Our theory to the dead tree was that perhaps it had outgrown the container it was in. We were hoping the tree would only grow to the capacity of the planter, staying that size instead of growing into a large tree. Where we live is prone to very mild winters, however, it is not uncommon to have short bursts of freezing cold temps. It it got too big, we would not be able to bring it inside and protect it. The last ones that were in the ground died when we had icy weather.

We finally took our little, sad, dead tree back outside today. I figured it was gone, but did not have the heart or the time to pull it up out of the planter. While we were cleaning up some carrots from the garden, I looked over at the tree, sighing... but look!
Just when we thought all was lost with our little tree ... a little glimmer of hope came up through the ground! All is not lost!

We can apply this to life.
  1. Things are not always as they seem.
  2. Sometimes things do not go according to plan. Do not give up.
  3. Try and try again!
  4. Always have a back up plan.
Read how we got our avocado started by clicking the pic!


Maybe we will have avocados yet!


Disclosure: This post contains no affiliate links, However, I am Amazon Affiliate and may receive a small compensation for including links on my blog. Buying through my links is not necessary, just appreciated. Amazon does not charge extra for linked items recommended by their affiliates.  I only recommend products that I use and trust OR plan on using in the future. Please buy responsibly and do your own product research before buying anything online. 

Monday, August 17, 2015

Blossom End Rot

This Post Contains Affiliate Links.

     Homesteading, for us, has always been a 'Trial and Error' adventure. We have raised mini watermelons and squash, had mystery plants take over the front yard, potato bucket fails, strange eggs, and have two incubators full of eggs that never hatched. This, however, is one of the oddest things we have ever seen... 
What on Earth? 
It looks like something on an alien movie!

???
     So I posted the photo in a gardening forum. Someone mentioned blossom end rot. I did a little searching and found a photo that looked just like our crazy alien zucchini squash on THIS website. Blossom end rot it is! 


But what is blossom end rot? 

Blossom end rot is when the plants have a calcium deficiency. Like calcium helps to build our bones, calcium also helps a growing plant keep it's structure. If there is not enough calcium, the structure of the plant starts to break down at the end of the plant. The end where the blossom is, starts to get mushy and decay. We do have some that have developed the traditional blossom end rot. 

However, our end did not rot, it just mutated.

So How Do You Fix It? 

The Missouri Botanical Gardens suggestion is to test the soil PH, stay away from high ammonia fertilizers and get some Calcium Nitrate to help prevent the ends from rotting. 
     Another site recommended using Gypsum or Lime in your garden to help balance the soil for optimal calcium intake. Also, do not over water. If you notice blossom end rot on your plants, remove the affected fruit and spray with a calcium rich fertilizer. 

What Are You Going To Do?

Nothing. It is the end of the season and the garden is winding down. I think I will work on building up the nutrients in the garden for next year after the garden has died out for this year. 

So What Did You Do With The Alien Looking Thing? 


I let Zoey dissect it of course! :D We just had to see what was under all the craziness. And guess what we found... 


     Nothing much. Just looked like a regular zucchini. Zoey tried a nibble of it and said it tasted normal as well. (She likes to eat raw zucchini.) We did not eat the rest of it because, I already have 4 more waiting to be eaten. Zoey thought the pig might like it, so into the slop bucket it went. 

We love your comments! Do you have any crazy produce photos to share? 


Disclosure: I am Amazon Affiliate and may receive a small compensation for including links on my blog. Buying through my links is not necessary, just appreciated. Amazon does not charge extra for linked items recommended by their affiliates. I only recommend products that I use and trust OR plan on using in the future. Please buy responsibly and do your own product research before buying anything online. 

Wednesday, August 5, 2015

Well, That's NOT Cabbage!

This Post Contains Affiliate Links.


     Right before hubby's accident, our amazingly awesome neighbor, Bree, gave us an assortment of plants she got from the store. There was lettuce, spinach, and cabbage. We kept them in the garage with the plan to plant them as soon as it was time. True to our luck, our plans failed, and most of the plants died while we were in the hospital. My garden plans were thwarted even more with all of the crazy storms. The garden was not put in as early as I had hoped. 
     By the time we got our garden in the ground, the only plants left were the cabbage... or so I thought. Only, these cabbage plants were not like any I had ever seen before. The leaves were coming out from the top, and a little from the sides. They were not hugging the cabbage head like I was used to seeing. I was really starting to wonder, "What kind of cabbage is this?" So I called the person who gave them to me. She once again said, "Cabbage." She didn't know any more than that. Her aunt had bought them for her. Great...

     When the awesome neighbor came over, we walked my garden. I finally got to show her why I was so confused. "It's kohlrabi." What? Could you repeat that please? "It's kohlrabi."
Well, That's NOT Cabbage!
     Turns out, kohlrabi IS a type of cabbage. I had just never heard of it. I didn't even know how to fix it, eat it, or what to do with it. What the heck is this stuff? I asked around. Most of my friends just said to peal it, slice it up and eat it with Ranch Dressing. Everything tastes better with Ranch, right? 

Okay, let's do this!
     I was really hoping it tasted like Jicama, but it didn't. It was kind of peppery, but not. It was kinda sweet, but not. And it was not good to anyone in my family... Now what? I have all of these kohlrabi plants. I can't just waste it! 

     So I did another shout out on Facebook to see how others prepared it. However, I have not been brave enough to try them yet. My next 'Try' will be to dice one up and fry it like a potato. Wish me luck! 


Some interesting facts about Kohlrabi:


  • The whole plant can be eaten raw or cooked
  • It's name means 'cabbage turnup'
  • Kohlrabi is actually pretty nutritious
  • My animals love getting the leaves as a treat


Here is how some of my blogger friends prepare theirs:


How do you prepare your kohlrabi?

I'm open to suggestions!


Disclosure: I am Amazon Affiliate and may receive a small compensation for including links on my blog. Buying through my links is not necessary, just appreciated. Amazon does not charge extra for linked items recommended by their affiliates. I only recommend products that I use and trust OR plan on using in the future. Please buy responsibly and do your own product research before buying anything online. 

Friday, July 10, 2015

Potato Bucket Reveal

This post contains Affiliate Links.

     It has been some time since I posted an update on our potato bucket. The first Potato Bucket did not go so well. Due to human error, it ended up being a big FAIL. We refused to give up, so we started again. This time, our bucket would be left completely outdoors. It grew rather quickly. 


     Suddenly, it was a big, giant, beautiful plant! We were so excited to finally have a bit of success with this project. Sometime after this photo was taken, some strange red beetles we have never seen before, decided to eat most of the plant. I asked Mike to get us some DE to put on the plant to hopefully get rid of the pesky beetles. It did not work as well as I would have liked, however, most of the bugs did disappear for a couple of days. The damage was already done, and my beautiful plant was not so beautiful anymore. Also, it seemed to have developed some sort of fungus that looks a lot like THIS.
     So by that time, we figured it was time to see what we had grown. I am not video editing savvy, Zoey is a little nervous and after 5 tries, this is the best video we got! :D I also realized I have two YouTube channels. One in my own name, and one under the blogs name.. go figure!

So... Take 5 Zoey!  Your line is... 

     
     So how do we like growing potatoes in buckets now? Still on the fence. This try went better than the last, but still not a great yield. I think I am going to wait and see how the potatoes in the garden grew before I make my decision. 


Disclosure: I am Amazon Affiliate and may receive a small compensation for including links on my blog. Buying through my links is not necessary, just appreciated. Amazon does not charge extra for linked items recommended by their affiliates. I only recommend products that I use and trust OR plan on using in the future. Please buy responsibly and do your own product research before buying anything online.

Wednesday, March 18, 2015

Potato Bucket FAIL

This post contains Affiliate Links.

     
     Yes, I said, "FAIL." But I am not sure of the reason why. One day my potato plant is growing like a weed. The next it is dying off rapidly. 
From this... To this... 
In just a matter of days.
     So what happened? Like I said, I am not sure. However, I have some suspicions.. The day after I took the first picture, we had some very lovely overcast 70 degree weather. Of course I put my bucket outside so make sure it got some sun, and not just the light from the garage. It was only out for a few hours, but I might have shocked it. THEN, after I brought it inside, I used some left of fertilized water that I was using for my other plants. Maybe the combo of the outside time, and the shock of fertilized water? 
    After it started dying, we continued to keep it indoors in it's usual home and water it. We were hoping it would get over it's shock and continue to grow. After a month, there was still nothing... Time to dump the bucket and look to see what happened. 


     Nothing but some potato shells, unidentified seedlings, and a new wormie friend. FAIL! I don't think it is a 'Bucket In The Garage' fail, but a simple Human Error Fail. Another Ooops! We refuse to be discouraged. We still have a box of red potatoes trying to grow under the kitchen counter. We started over on our Potato Bucket Experiment
    This time, it will be left outside as much as possible. We are scheduled for some beautiful 70 degree weather by this weekend and the nice weather should stay until the end of this month. Then another cold spell is expected. We can't wait to start our outdoor garden. I guess prepping the garden area and starting some seeds indoors will have to curb our Spring Fever for now! I have also been looking into buying a Survival Seed Vault like this one, instead of or in addition to this smaller one I have been eyeing! I really like them both. 


Will you be growing a garden this year? 
We love your comments!


Disclosure: I am Amazon Affiliate and may receive a small compensation for including links on my blog. Buying through my links is not necessary, just appreciated. Amazon does not charge extra for linked items recommended by their affiliates.  I only recommend products that I use and trust OR plan on using in the future. Please buy responsibly and do your own product research before buying anything online. 

Saturday, September 27, 2014

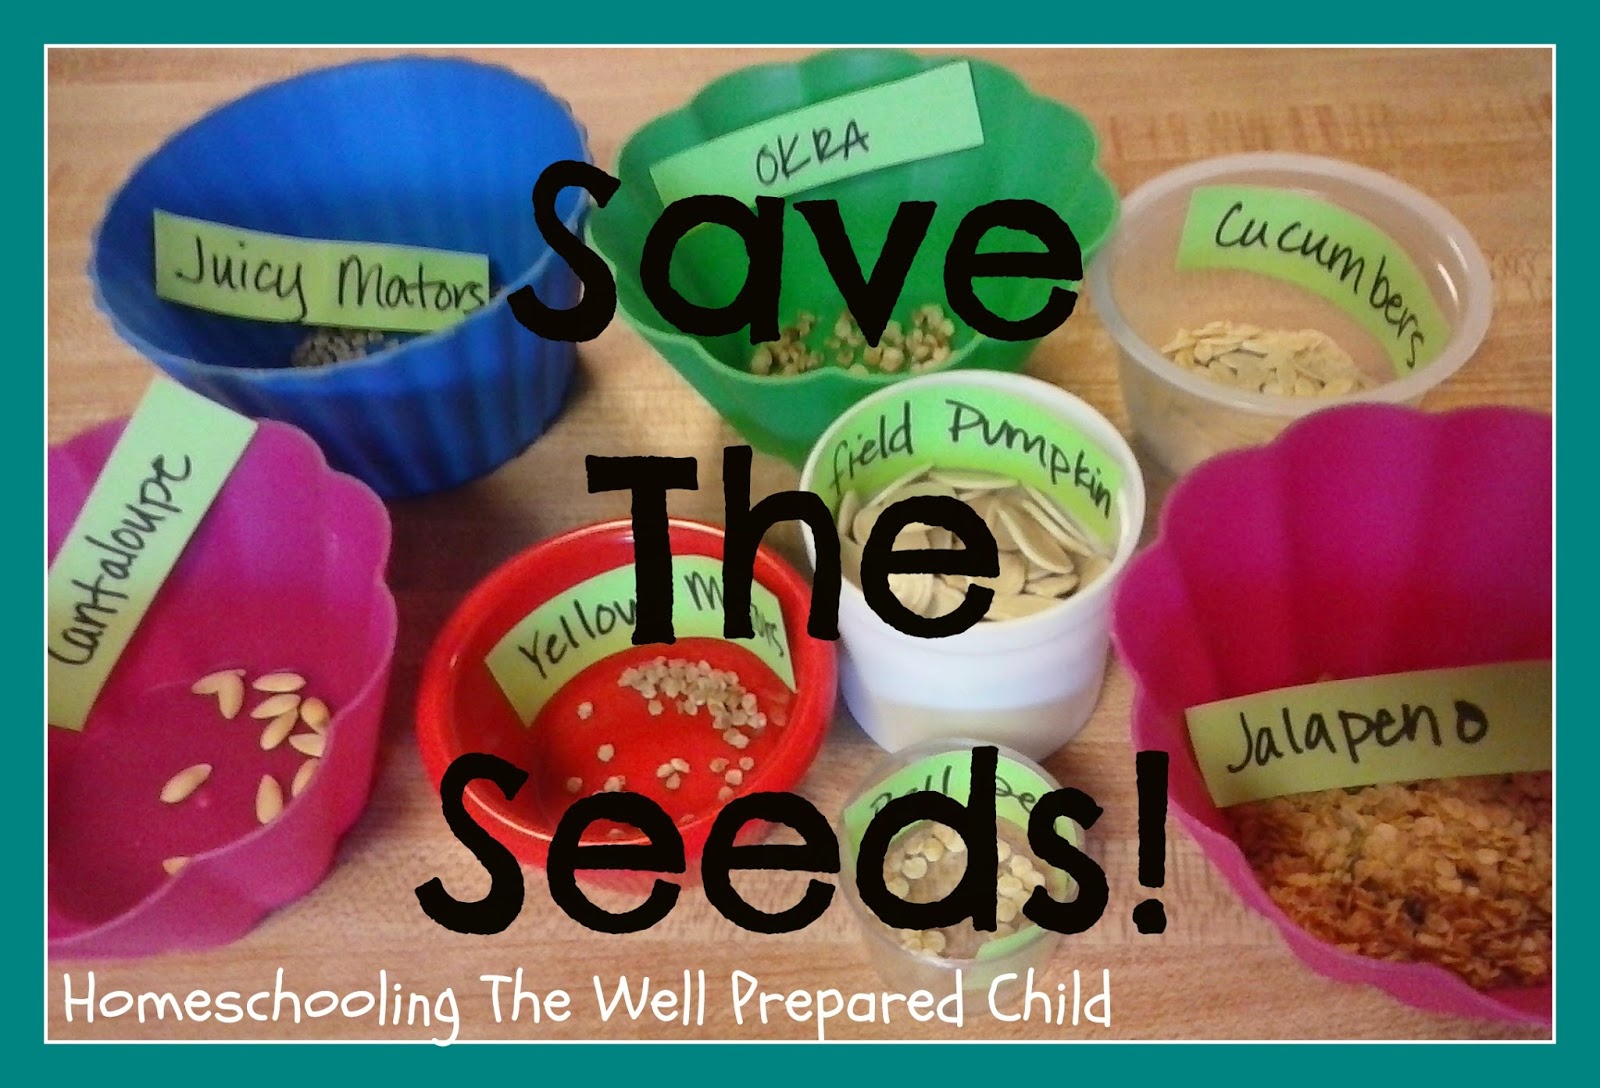
Save The Seeds!


"All the gardening knowledge in the world will be of no use, 
if you do not have seeds to sow." Kamay Flemens

     For years we have saved seed packets from various stores. Just recently choosing to buy heirlooms to grow and save. Heirlooms are seeds that have been grown, harvested, and saved from generation to generation. However, seeds bought in packets, do not last forever. My endless thoughts of 'what if there were no stores' prompted me to get serious about saving our own seeds from the garden. Because I believe in teaching and learning as a family, we researched how to save seeds, picked the best fruits, and harvested them together. (Although, my daughter actually did most of the seed harvesting for us. I assisted and took photos. :) )
     I heard once, when saving seeds, to use the best of the best. Best plant, best producer, best tasting fruits and vegetables. We did not harvest seeds from our mini plants because we never want mini plants again! We still have plenty of the cherry tomato seed packets, so we did not save those either. We also choose plants we knew we would eat or be able to use for trade or barter. There is no point saving seeds from plant varieties your family turns their noses up to unless you have another use for them. 
     Here is a bit of what we saved. Not everything was photographed...


Okra- Carefully split the okra length wise, being careful not to cut the tiny seed balls. Use your thumb to gently pop the seeds out. When finished, make sure all green plant material is removed. Set aside for a week or two to insure full dryness. I am interested to see if this worked. They looked nothing like what I used from my store bought seed packet. 

 They dried all wrinkly and I don't remember the seeds in the packet looking quite like that. This photo is before they dried fully. 


Field Pumpkins- Carve open pumpkin top and remove all seeds. Rinse seeds in a strainer and make sure all pumpkin pulp is removed.  They sat in the strainer for a few hours so that most of the water dripped away. Then, we placed the seeds on a plastic plate and moved them around often to insure even dryness and to keep them from sticking together. 
Cucumbers- While making pickles, we had tons and tons of seeds left in the bowl from cutting the cucumbers. My daughter just collected them from the bottom of the bowl and took out all the seeds that had been cut in half. She used a strainer to wash them and make sure there were no pieces of flesh with them. Just like the pumpkins, we let them stay in the strainer for a few hours to make sure the excess water had time to drip off. 


Jalapenos- Although we do not eat these much except for in salsa and for spicy pickles, we saved the seeds from some jalapenos we used for a FAIL at cheddar poppers. While we cored them, we dropped the seeds into a bowl. They dried in the bowl for a couple of weeks.
 (When harvesting seeds from any spicy pepper, please use gloves! USE THEM! The seeds and the core are spicier than the green flesh. Even though I washed my hands thoroughly, and my hands did not burn, everywhere I touched on my body after that BURNED LIKE WILD FIRE! I just so happened to be suffering from allergies and had itchy eyes. It was brutal! If you do happen to get burned by the oils in the jalapenos, milk helps. I used a washcloth to scrub my hands and face with the milk. Raw milk from any source is better. Raw sources include cows, goats and even humans. Yes, booby juice works too, or so I hear.. no booby juice around my house anymore.)

Cantalupe- A friend of mine brought a cantaloupe to me from her father's garden. It had a lovely texture and was sweet and juicy. After digging out the seeds from the center, I placed them in the strainer and washed all the goo away from them. They drip dried and were placed on a plate to finish the drying process.  

Bell Peppers- They have been a test this year. They were not as big as a store bought bell pepper. I am not a big fan of them, but I wanted to use them in salsa. I never got the chance. We did not have the tomatoes we needed at the time to make salsa with them. When we had tomatoes, I had already cut up the bell peppers to save seeds or had given them away. We did test eat them raw. It is not something my family enjoyed. They will be good for trading and bartering if needed. 

Tomatoes- Now this one I will go into more depth on in another post. They are a huge staple in my household and I believe we could nearly live off of them. My whole family loves tomatoes. Before we got serious in seed preservation and looked up how to save tomato seeds, we tried a couple of ways to dry the seeds. First, we took the seed pulp from a tomato we cut and placed them on paper towels. The seeds stuck to the paper towel as it dried and they were not very nice looking. I tested one to see if it would germinate, and it did. Then we brainstormed ideas on how to do it so they would come out cleaner.. but that is all in THIS  post. :)

     Now at this point, can you imagine what my kitchen looked like? There were plates, cups, bowls, and paper towels all over the place. It drove me nuts! I don't have very much room in our house. There is no pantry, laundry room, spare room at all to store all of the drying seed containers we had at this point. I finally got smart and gathered every small container we have and put all of them in a casserole pan. Safe, secured, compact storage! It took a few weeks to actually feel they were all sufficiently dry enough to store away.  We used a variety of different small recycled packages to store our seeds in. A variety, because, we couldn't eat enough Tic Tacs fast enough. We are all about FREEcyle! :D 


     Have you tried seed preservation? 
Save The Seeds!
     
More great seed saving advice and FREE PRINTABLE SEED PACKETS at 104 Homestead

For a great definition of heirlooms, hybrids, organics and all the other seed lingo, check out Underwood Gardens post. 

Want to start your own vault of survival gardening seeds without preserving them yourself?  Survival-Seed-Vault-
     

This post contains my Amazon affiliate link to a survival seed vault. Although, I have not ordered from them, it is something I would like to purchase in the future. If you happen to buy one, let me know what you think of it!

Sunday, September 21, 2014

Why We Prep As A Family: Part 2


Knowing is not enough: we must apply.
Willing is not enough: we must do.
~Johann Wolfgang von Goethe

     If I had to feed my family from what I grew in my garden this year, we would have starved. It just was not a good year for us. I have read thousands of articles and web pages about gardening. We researched, prepped, learned, asked questions... and still it was not enough. 
     We tilled, weeded, watered and hoed. Still could not keep up with the grass and weeds in my garden. My daughter and I fertilized, hand pollinated, and pruned. Still our plants would not flourish. It wasn't all bad... sort of. 
     Although my best producer this year was cucumbers, I was only able to put back about 20 jars of pickles. We ended up eating half of them already. (Well, the hubby and kids did at least!)
      I dehydrated some zucchini and was able to put up one jar. Sadly, our zucchini did not grow anymore after that. 
          Water Melons and yellow squash grew to be mini fruits. (I'm including photos just in case you think I am exaggerating..) Oh ya, the corn only produced about 6 ears and they too were pretty small.

     Out of 3 tomato plants, I got a total of one tomato. It was strangely shaped and looked as if it had worms in it. Cherry tomatoes did okay. However, they only ripened a few at a time and were pretty much eaten off of the vine. 

      Onions were fabulous, but I stored the other half of the bulbs I did not plant in the freezer and they were mush when I pulled them out to plant a second round of them. 
      My lettuce was too bitter for the family to enjoy. It became treats for the livestock. Spinach and carrots were eaten by the moles. Okra is growing slowly but surely... but only enough to have as a side dish once a week. 
     We also lost one of our fruit trees we planted last year. It was growing great, had fruit developing, and then suddenly, it was dead. I can only suspect that maybe the moles ate the roots? 
     
What did go good? Jalapenos. (Insert WTHeck face here)

     The animals on our farm are about the same as our garden. We added rabbits. Too small to even try to have as a meal. They will be our 'mommys'  instead. We added a buck just last week. It will be a month or so before we know if he figured out what to do. Now honestly, I am not really even sure I can butcher a rabbit. So we will be selling the kits instead. At least for now. 


       Chickens... What can I say about our chickens... Out of 2 FFA chickens, 3 store bought, 4 hatchlings from the school, and 2 bartered Jersey Giants, we have 5 hens. Maybe 2 of them are laying and not on a daily basis. I have 5 roosters to send to freezer camp. It has been so hot, I have not even wanted to attempt it. I have found chicken butchering to be a very stinky job in the summer. If I had to do it, I could. Right now, I do not have to.
     We actually managed to NOT get attached to our feeder pig. He will be heading off to the butcher in about a month. Hopefully. I have still not made an appointment. I need to get on that asap. 

     What have we learned this year? Being a farmer is not as easy as it seems. We believe our soil needs a lot of amendments before we try to plant again next spring. We also need to build an area for a compost pile. We have a bin right now and it is full to the gills. We also need to do some more research on the fruits and vegetables we want to grow.  
     Understand though, it does not matter how much research or book learning you cram into head. You have to put your knowledge into practice. There are so many things that can go wrong; even if you are knowledgeable. Things happen. If we had an emergency this year and had to rely on my preps and gardening to feed us, we would have starved. At least right now, I have time to fix things. Practice more. Try new things. I am grateful for these learning times. 

What are you doing this year to 'walk the walk?'