Enter your email address:

Delivered by FeedBurner

Homeschooling The Well Prepared Child: experiment
Showing posts with label experiment. Show all posts

Sunday, July 6, 2014

Parts Of A Plant: Seeds

This post contains Affiliate Links.

Parts of a Plant Lesson: Seeds


     We started with Nutrientsforlife.org's Video, Lesson 1: Plants Around You. See the video HERE.

  •    After watching the video, we went on a nature walk to gather seeds from plants around us. We were actually surprised at all the seeds we found. It was actually closer to winter time than fall. I just had her get a little from each plant we found.  


  • When we got home, she set all of the seeds together in a pile. I asked her if she could separate all the seeds into 2 piles. She separated them by round seeds and flat seeds. I asked her if she could separate them into 3 piles, and she decided it should be by size. 
  • Next activity was separating them back with their own seeds in a muffin tin. Some resembled each other so much, she got out her magnifying glass to tell them apart. 
  • I found a neat 'Seed Graph' for her to organize the data she collected on which plant did she gather the most seeds from. you can find it HERE (mpm school supplies actually has a lot of cool ideas and links to more cool ideas) She glued the different seeds to the bottom of the graph and then counted them up and filled in the correct number on the graph. The graph went into her Gardening Portfolio. 

  • She really liked checking out the seeds under the magnifying glass. From my seed stash, I got out lettuce seeds and let her make her own observations. She recorded her findings in her Science Notebook. Don't have a magnifying glass? I found ours at our local Dollar General in the school/stationary section. but you can also find one on Amazon HERE
  • While checking out a Time Lapse Video of a Seed Growing, my daughter said it would be cool to plant our own seed and watch it grow in normal time. Great Idea! I found an old square aquarium and we filled it with our seed starter mix. Then she placed 4 English Pea seeds against the the side of the aquarium. We watered it and watched the seeds grow. She recorded what she witnessed in her Science journal as well. 
  • It was not as easy to see as the video, but we enjoyed it just the same. you can use a variety of seeds for this experiment. Pinto beans and pumpkin seeds work great too! You can also use a small jar filled with moist paper towels with the seed up against the glass. 
  • The next activity we did involved fermenting pinto beans. We placed a few dried pinto beans into a shallow bowl of water and let it sit a few days, adding water as needed. I asked my daughter to predict what she thought was going to happen, she recorded this in her science journal. After the pinto showed signs of growth, we dissected them. She drew out what she found and labeled the parts of the bean. We did not get any photos of this lesson, but I borrowed a couple from a homeschooling friend of mine that inspired this lesson for us. Her children are a little older so they have labeled a lot more than we did, with more scientific terms. Just another example how you can use one lesson for many different levels of children. Thank you Mary and the Butler Children for allowing us to use your amazing photos. 

  •  If those words are too advanced for your kiddo, there is a simpler worksheet HERE
There are more activities and worksheets at 
Nutrients For Life

We hope you enjoyed Parts of a Plant: Seeds lessons. Other pages in the series, can be found here:


Disclosure: I am Amazon Affiliate and may receive a small compensation for including links on my blog. Buying through my links is not necessary, just appreciated. Amazon does not charge extra for linked items recommended by their affiliates.  I only recommend products that I use and trust OR plan on using in the future. Please buy responsibly and do your own product research before buying anything online. 

Wednesday, July 2, 2014

Parts of a Plant: Tendrils


This post does not contain Affiliate Links.

     Earlier this month, my daughter and I were discussing the 'mysterious' plants in our edible landscape. We discovered they are pumpkins. 3 little pumpkin plants have turned our front yard into a jungle.

And yet, there are only 3 pumpkins that have actually gone to fruit. 

     We sat on the lawn, talking about pollination and the lack of bees this year. I played with a tendril absentmindedly as we discussed trying to pollinate them ourselves. Suddenly, I realized the tendril was slowly wrapping around my finger. My daughter was also touching a tendril and it had started to curl as well. We played with several of the tendrils until we had an idea. Maybe, we should video this and post it for others to see? This may be common to country folk, but to us city girls, this was simply amazing! We decided others might feel the same as well. So we made a video. 

Then my daughter asked a good question, 

'WHY do they do that?' 

We Googled it and this is what we found. 

Tendril


From Wikipedia, the free encyclopedia
Not to be confused with Tendrils.

In botany, a tendril is a specialized stem, leaf or petiole with a threadlike shape that is used by climbing plants for support, attachment and cellular invasion by parasitic plants, generally by twining around suitable hosts. They do not have a lamina or blade, but they can photosynthesize. They can be formed from modified shoots, modified leaves, or auxiliary branches and are sensitive to airborne chemicals, often determining the direction of growth, as in species of Cuscuta.[1]


Answers In Genesis says:

'When a tendril touches a fence post or similar object, it produces auxin, which is sent to other cells that have not touched the object. These cells then grow faster than the cells in contact, causing the tendril to curl around the object. The tendrils then use the object to support the plant and allow it to climb.'    You can find the rest of this article  HERE. 


     So basically, it is sensitive to touch and tries to wrap itself around what ever it touches to provide more support for the growing plant. AMAZING! Ready for the video? Now be nice! This is our first one! 

Isn't that amazing! 


Disclosure: I am Amazon Affiliate and may receive a small compensation for including links on my blog. Buying through my links is not necessary, just appreciated. Amazon does not charge extra for linked items recommended by their affiliates.  I only recommend products that I use and trust OR plan on using in the future. Please buy responsibly and do your own product research before buying anything online. 

Tuesday, June 24, 2014

Portfolios and Journals

  
This post contains Affiliate Links. 

        I have received a lot of messages asking to hear more about my daughter's portfolio and journal for science. She has a journal and folder for every subject, but, these two are our favorites. Everything plant related we have studied goes into them, although, her science spiral is for everything science related. Let us take a look inside!


 She was very proud of her cover artwork.


Diagram from www.uic.edu
We talked about the parts of a tomato plant and them drew her own plant on a separate piece of paper. Then she labeled them with help of the first photo. Both papers went in to her Plant Portfolio.


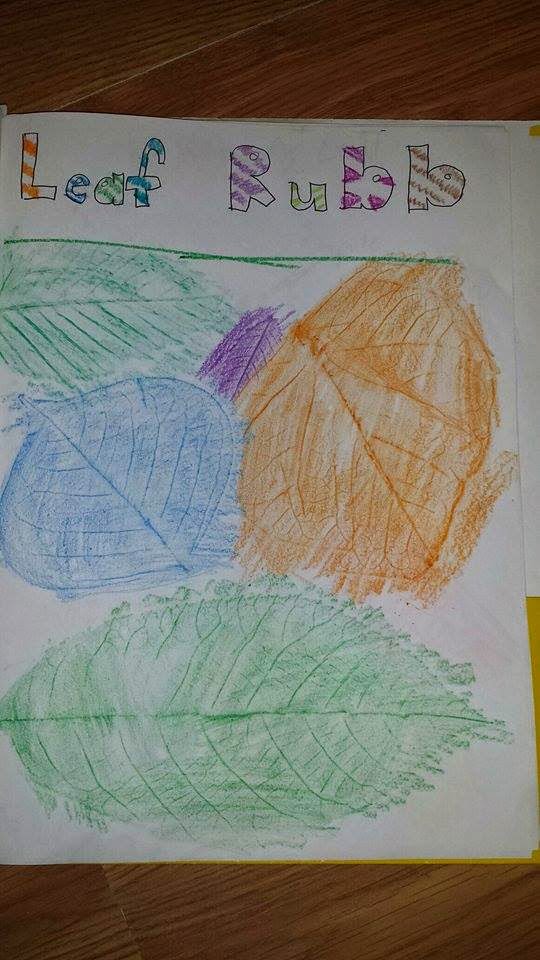
After a nature walk, she came in and made leaf rubbings to study the different types of veins each leaf had. 

She chose the leaf she liked best, made a leaf rubbing of it, and then labeled the parts of the leaves.

When we planted our tomato plants, she measured then every other day and then wrote her findings on the Excel paper she created. 


     Also in her portfolio are the different work sheets and printable information she learned about.
Information on plants from 'Instructor Web'
A Quiz from NeoK12 she printed out. 
    
   Inside of her 'Science Notebook' are journaling questions, written notes from books we read from the library that she did not want to forget, recorded observations and drawings. For example, when we were doing our 'Winter Tomato' experiment. Not only did she put her measurements in the Excel table, she also drew and wrote about the progress and growth of the plant. 


Water Filtration Project


 Learning about Container Gardens


How to Grow a Garden

   Portfolios and Notebooks are not just for science. They are great when you are working on a 'Theme" study unit and are pulling from various sources. Math, literature, reading, and geography can also have their own spiral notebook and folder.

At the beginning of the school season, our local Big Box Store has these and other supplies for super cheap! Stock up!


Disclosure: I am Amazon Affiliate and may receive a small compensation for including links on my blog. Buying through my links is not necessary, just appreciated. Amazon does not charge extra for linked items recommended by their affiliates.  I only recommend products that I use and trust OR plan on using in the future. Please buy responsibly and do your own product research before buying anything online. 

Sunday, June 22, 2014

Parts Of A Plant- The Stem

This post contains Affiliate Links.

    If you are going to garden, you need to know about the parts of a plant and their functions. This lesson is on the function of plant stems. 


Celery Stalk Experiment

What you will need:

  • 1 stalk of celery, cut diagonally at the bottom
  • 1 Tall cup filled half full of water
  • Food coloring of your choice (I asked her to choose what color she thought would show up the best against the green of the plant. She chose red)
  • Peanut Butter (for a snack later, this is optional :) )


Step 1: Choose your piece of celery for your experiment. Cut diagonally along the bottom. Please supervise your child closely if they are cutting it themselves. 


Step 2: Add enough food coloring into your cup to turn the water a nice dark color. Put the stalk inside the cup, cut side down and the leaf side up.

Step 3:   Allow your celery to sit a while to give the stalk time to soak in and pull the colored water through it's veins. We let ours sit for 2 days to get the maximum absorption. Can you see the red veins in the celery?  
Step 5: Allow your child to dissect their celery stalks and make their own inferences. It is not so appetizing at this point. She really enjoyed taking it apart though, and she was able to see what parts were the veins and how they traveled. 
Step 5: Have a snack! My daughter decided she did not like celery and peanut butter. She got out the ranch dressing and ate hers with it. I, on the other hand, almost took down half a jar of peanut butter with my celery! OOOPS! (If you or someone you are doing this lesson with are allergic to peanut butter, try some cream cheese on it! Do not eat peanut butter if you have a peanut allergy.)
     Now I suppose you are wondering how to make this lesson less preschool/lower grade and more of a higher level of thinking lesson. It's easy! The 'veins' in the celery actually have really cool names and their own functions. Xylem and phloem are the vascular tissues found in celery and other plants that work just like veins do in our bodies. Also in the function of transporting water and nutrients throughout the plant are more scientific terms like: Translocation, Adhesion, Cohesion, Transpiration and Stomata. Now the best way I have found to get children to really understand these terms and functions is to have them look them up themselves. 

Other brainstorming activities: 
  • Find other plants you can do this same experiment on like roses and carnations. If you use a white flower, you can change the colors of the petals. 
  • Start a 'Scrap Garden' from the end of your celery plant. 
    • Draw the end of the celery and label the parts of the stem. 
    • If your child does not have one already, start a spiral notebook to be their "Scientific Discoveries" journal. We use ours a lot to journal the progress of our plants and science experiments. It is also a place for her to reflect upon the activities we have done. 

    • We also have portfolios that we put our loose papers and work sheets in. She also puts in any good info she finds and prints from the web. My daughter makes her own graphs and charts on MS Excel to go with our lessons. Those graphs go in here after she fills them out during our experiments. Want to know more about using portfolios and notebooks? Click HERE.

    • Go to the library and check out books about gardening with kids and parts of a plant. 
    • Youtube has a lot of great videos on the subject as well. 

    Check out our other 'Parts of a Plant' lessons in this series! 
    Parts Of A Plant: Seeds
    Parts Of A Plant: Tendrils


    (And if I can figure out how to get the worksheets we created to change formats for the different computer, we will post those too! :)


    In the meantime, here are some websites that have great information on this topic! (These are NOT affiliate links)


    Disclosure: I am Amazon Affiliate and may receive a small compensation for including links on my blog. Buying through my links is not necessary, just appreciated. Amazon does not charge extra for linked items recommended by their affiliates.  I only recommend products that I use and trust OR plan on using in the future. Please buy responsibly and do your own product research before buying anything online. 

    Wednesday, June 18, 2014

    YOU ATE A WHAT?

        This post contains no Affiliate Links. 


        As soon as I would tell someone, they would immediately make the sour pucker face, shake all over like a seizure and turn green. Some ran away screaming in fright. So of course I would have to tell them again, "We ate snake last night!" Same reaction, kinda funny. "You ate a what?" "Yes, we ate a snake." Complete and total freak out! Got to love it!
         Yes, we ate a snake. Yes, it was good. Yes, we will probably eat another if we can catch one again. "Who killed it?'
    "My husband."
    "Did you skin and gut it?"
    "No, my son did. I didn't even realize what was going on till he brought it to me and asked how he could cook it."
    "But, you ate it?"
    "Well, yes of course I did!"
    (Insert retching/gagging sound here!)

         Truth be told, we as a family, have wanted to try snake for a while. That is what happens when your son is a survival show junkie. Since he was old enough to watch t.v. he loved animal documentaries and shows. His teachers would comment on how he was the only one that would watch a documentary when they were studying certain animals. He was glued! When shows like "Survivor Man' started popping up everywhere, he was hooked. What boy in the country wouldn't be? Now that he is older, he has boasted his adventures through the woods and down the creek. (Where he should not have been cause it was forbidden. Can't be mad, cause at his age, that is where I would have been as well!) Many a time has he asked me, "Mom, if i find a snake, will you cook it for me?" "Well, yes, as long as you don't mess with it and show us the snake first so we can make sure it is not venomous" "What if I get a squirrel?" "You skin and gut it, I'll cook it!" Since that day he has watched his shows, dreamed of being a survivalist, and kept a look out for snakes and other critters he could eat.
         Once, son and daughter brought me a tiny, thin snake. Rescued from the cat a moment too late, its head was the only thing damaged. "Mom! Let's cook it!" It looked way too small. "If you can skin and gut it, I will cook it!" Several frustrating minutes went by. Not a very easy clean nor a whole lot of meat from the wiggling dead snake. Their faces were priceless. The cat was happy to get his prize back.
        So when your 17 year old son, who has waited YEARS to try snake, comes in with it skinned and gutted perfectly and says, "Mom, show me how to cook it!" Well then, that's just what you do!
         A small fire was made on the grill. He seasoned it with some garlic salt. (Everything tastes good with garlic salt, right?) My son patiently flipped his snake until it appeared to be finished cooking. When he tried it, he was not impressed. "It doesn't really taste like anything. Can you cook it like you cook garlic chicken in the pan?" In went some butter and garlic into the cast iron. 15 minutes later we were gathered around the kitchen counter, devouring a snake and pulling the delicate meat from around the tiny bones!
    I'm glad my son finally got to try snake, and also, that he was not disappointed! 

         Yes, we ate snake. Yes, we liked it. AND YES, we will do it again if we get a chance!

    DISCLAIMER FOR ALL OF YOU FREAKING OUT CAUSE SNAKES ARE WONDERFUL FOR THE ECOSYSTEM: I agree! And if the snake had not been in a fight with my dog at the time, he might have been able to go along his merry way. My husband did not know if it was venomous or not. Nor did he care at the time. This death did serve a purpose, we ate the flesh for dinner, chickens and dogs ate the insides and my daughter preserved the skin! Waste not, Want not! 


    Disclosure: This post contains no affiliate links, However, I am Amazon Affiliate and may receive a small compensation for including links on my blog. Buying through my links is not necessary, just appreciated. Amazon does not charge extra for linked items recommended by their affiliates.  I only recommend products that I use and trust OR plan on using in the future. Please buy responsibly and do your own product research before buying anything online.

    Monday, June 16, 2014

    Don't be a ROTTEN Egg!

     This post contains affiliate links.

        Recently, the son and I went to a small 'Mom and Pop' country store down the road from my mom's house. I had forgot to get eggs and they were selling fresh eggs from the owners own chickens. My daughter was not with us and she looked at the eggs with an odd look and said, 'How do we know they are really fresh?' Well now, that is a good question! And, a pretty good lesson for the day! (And honestly, I was a little leery buying fresh eggs from someone I did not know!)

    Photo from Gail Damerow's book Storey's Guide To Raising Chickens

        I remembered this post I saw on Facebook a little while back and I (very smart like) remembered to save the photo! The Chicken Chick let me know who to give the credit to. Gail Damerow's book Storey's Guide To Raising Chickens contains this excellent picture graphic to let you know how to tell if an egg is fresh or not. Of course we had to try! (And the book is now on my Wish List!)

         The eggs sunk like a ton of bricks and landed flat on the bottom! We cheered every egg we sunk! Fresh indeed! And at $2 a dozen for super large eggs, it was quite a steal. This activity was simple and yet it is another important skill every 'Well Prepared' child should know. You never know if you will have to barter or trade or buy from someone and want to make sure what they are selling you is fresh! (Can't wait to try on some eggs from the local 'big box' store!) 

    UPDATE: My mom called to tell me a funny story. While Zoey was at her house, she wanted to eat eggs for breakfast, but my mom didn't know how fresh they were. My daughter told her, "Hold on Grandma, let me show you how to tell!" She got out a bowl of water to test the eggs freshness. THEY ALL FLOATED! She turned to her grandmother and said, "Grandma! How long have you had these?" Haha! 


    Disclosure: I am Amazon Affiliate and may receive a small compensation for including links on my blog. Buying through my links is not necessary, just appreciated. Amazon does not charge extra for linked items recommended by their affiliates.  I only recommend products that I use and trust OR plan on using in the future. Please buy responsibly and do your own product research before buying anything online.