Enter your email address:

Delivered by FeedBurner

Homeschooling The Well Prepared Child: grow
Showing posts with label grow. Show all posts

Tuesday, September 30, 2014

Save The Seeds- Tomatoes


     Tomatoes are the most versatile plants to grow for my family. We eat them on salads, in soups and stews, in salsa (we eat a lot of salsa) or just sliced up in a bowl. I long to be able to can them. Stewed tomatoes, tomato sauce, diced tomatoes, tomatoes and green chilies, salsa, spaghetti sauce... Not only do homegrown tomatoes taste amazing, adding tomatoes to anything adds a higher nutritional content. Tomatoes even have medicinal benefits as well. 
       Although it was not OUR garden that blessed us with tomatoes, my awesome neighbor did! She had more than she could handle; while we had zip, zero, nada out of 3 tomato plants. What happened? I'm not sure. I suspect the soil we planted them in was not so great. I tried bunny poo, Epsom Salts, and other stuff. The cherry tomatoes did great, but they were in another section of the garden. Next year, tomato plants will be planted in our front yard, where the soil is best. We are hoping the new ones we planted late summer will produce something... But odds are, we are out of luck! Needless to say, we are making sure our next years crops will be high yield! 
     Previous attempts at saving tomato seeds consisted of saving stray seeds left on the cutting board. We placed them on napkins and let them air dry. They stuck to each other and the napkin. It was a huge nasty mess and I was not even sure how to store them. We wanted to try again, but were not sure what to do.  
     While the kids and I were making salsa one night, our tomatoes were extremely juicy and they made the salsa too runny. We squeezed the tomatoes out into a bowl before chopping them. So there was this bowl with all of these seeds. Seeds from the biggest, juiciest, yummiest tomatoes ever! They were begging to be saved! How, when they were covered in tomato goo? My first thought was tulle from my sewing shop. It is durable, has plenty of tiny holes, and would allow water to drain easily! My daughter ran to the sewing shop and cut us a big piece to use. She spent nearly 15 minutes trying to get the goo off from around the seeds. It worked but it was not as easy as we had hoped. We left them to dry inside of the tulle resting on a wash cloth. Within a couple of days, they were dry, and beautiful. The looked exactly like the seeds that come from the store. Success!
     It was the very next night that I saw a post on how to save tomato seeds using fermentation. It said the seeds separate from the goo after being allowed to sit in a little water for a day or 2. Of course we had to try it out! You can never have too many tomato seeds, right?
     My daughter worked on the tomatoes, while I worked the camera. She started by cutting the tomatoes in half and squeezing the pulp into an old plastic container. 

  Naturally, she had to sample some of the leftovers!

     We added water to the bowl and diced up the tomato remains for our salad at dinner. Waste not, want not! The tomato goo sat on the counter for 2 days. It was a little stinky already, and a little "GROSS!" to my girl, but she managed to get over it. She got out the strainer, laid the tulle inside and got to work rinsing the seeds. Took less than a minute! Amazing! 


Yes, that is a very old strainer. It was my mother's when I was a child. It's close to 40 years old!
We actually call it a colander, but people look at me funny when I call it that.  


     Next we laid the tulle pouch on a plate covered by a wash cloth. As it slowly dried, I played with the pouch, separating the seeds from each other. Finally, they were dry enough to take out of the tulle and be placed on a plate to finish drying. 
     The turned out quite pretty, don't you think? 
     The last step was to see if they would germinate. We placed one seed from our first attempt and one from our second attempt in a cup of soil in the bathroom window. Within a week, we had tiny little sprouts growing. They BOTH germinated. We will be using these plants as part of our 'Winter Garden' this year.
     I do have to say, fermenting the seeds made it a lot easier to get the goo off from around the seed. Both processes worked, however, I would highly recommend fermenting them if you are trying to save your own seed. I know it takes longer because it needs to sit in the water for a day or two, but it sure was less frustration trying to get them clean! 

Do you have any tips for seed preservation? Let us know. 
We love your comments! 


Sunday, July 6, 2014

Parts Of A Plant: Seeds

This post contains Affiliate Links.

Parts of a Plant Lesson: Seeds


     We started with Nutrientsforlife.org's Video, Lesson 1: Plants Around You. See the video HERE.

  •    After watching the video, we went on a nature walk to gather seeds from plants around us. We were actually surprised at all the seeds we found. It was actually closer to winter time than fall. I just had her get a little from each plant we found.  


  • When we got home, she set all of the seeds together in a pile. I asked her if she could separate all the seeds into 2 piles. She separated them by round seeds and flat seeds. I asked her if she could separate them into 3 piles, and she decided it should be by size. 
  • Next activity was separating them back with their own seeds in a muffin tin. Some resembled each other so much, she got out her magnifying glass to tell them apart. 
  • I found a neat 'Seed Graph' for her to organize the data she collected on which plant did she gather the most seeds from. you can find it HERE (mpm school supplies actually has a lot of cool ideas and links to more cool ideas) She glued the different seeds to the bottom of the graph and then counted them up and filled in the correct number on the graph. The graph went into her Gardening Portfolio. 

  • She really liked checking out the seeds under the magnifying glass. From my seed stash, I got out lettuce seeds and let her make her own observations. She recorded her findings in her Science Notebook. Don't have a magnifying glass? I found ours at our local Dollar General in the school/stationary section. but you can also find one on Amazon HERE
  • While checking out a Time Lapse Video of a Seed Growing, my daughter said it would be cool to plant our own seed and watch it grow in normal time. Great Idea! I found an old square aquarium and we filled it with our seed starter mix. Then she placed 4 English Pea seeds against the the side of the aquarium. We watered it and watched the seeds grow. She recorded what she witnessed in her Science journal as well. 
  • It was not as easy to see as the video, but we enjoyed it just the same. you can use a variety of seeds for this experiment. Pinto beans and pumpkin seeds work great too! You can also use a small jar filled with moist paper towels with the seed up against the glass. 
  • The next activity we did involved fermenting pinto beans. We placed a few dried pinto beans into a shallow bowl of water and let it sit a few days, adding water as needed. I asked my daughter to predict what she thought was going to happen, she recorded this in her science journal. After the pinto showed signs of growth, we dissected them. She drew out what she found and labeled the parts of the bean. We did not get any photos of this lesson, but I borrowed a couple from a homeschooling friend of mine that inspired this lesson for us. Her children are a little older so they have labeled a lot more than we did, with more scientific terms. Just another example how you can use one lesson for many different levels of children. Thank you Mary and the Butler Children for allowing us to use your amazing photos. 

  •  If those words are too advanced for your kiddo, there is a simpler worksheet HERE
There are more activities and worksheets at 
Nutrients For Life

We hope you enjoyed Parts of a Plant: Seeds lessons. Other pages in the series, can be found here:


Disclosure: I am Amazon Affiliate and may receive a small compensation for including links on my blog. Buying through my links is not necessary, just appreciated. Amazon does not charge extra for linked items recommended by their affiliates.  I only recommend products that I use and trust OR plan on using in the future. Please buy responsibly and do your own product research before buying anything online. 

Wednesday, July 2, 2014

Parts of a Plant: Tendrils


This post does not contain Affiliate Links.

     Earlier this month, my daughter and I were discussing the 'mysterious' plants in our edible landscape. We discovered they are pumpkins. 3 little pumpkin plants have turned our front yard into a jungle.

And yet, there are only 3 pumpkins that have actually gone to fruit. 

     We sat on the lawn, talking about pollination and the lack of bees this year. I played with a tendril absentmindedly as we discussed trying to pollinate them ourselves. Suddenly, I realized the tendril was slowly wrapping around my finger. My daughter was also touching a tendril and it had started to curl as well. We played with several of the tendrils until we had an idea. Maybe, we should video this and post it for others to see? This may be common to country folk, but to us city girls, this was simply amazing! We decided others might feel the same as well. So we made a video. 

Then my daughter asked a good question, 

'WHY do they do that?' 

We Googled it and this is what we found. 

Tendril


From Wikipedia, the free encyclopedia
Not to be confused with Tendrils.

In botany, a tendril is a specialized stem, leaf or petiole with a threadlike shape that is used by climbing plants for support, attachment and cellular invasion by parasitic plants, generally by twining around suitable hosts. They do not have a lamina or blade, but they can photosynthesize. They can be formed from modified shoots, modified leaves, or auxiliary branches and are sensitive to airborne chemicals, often determining the direction of growth, as in species of Cuscuta.[1]


Answers In Genesis says:

'When a tendril touches a fence post or similar object, it produces auxin, which is sent to other cells that have not touched the object. These cells then grow faster than the cells in contact, causing the tendril to curl around the object. The tendrils then use the object to support the plant and allow it to climb.'    You can find the rest of this article  HERE. 


     So basically, it is sensitive to touch and tries to wrap itself around what ever it touches to provide more support for the growing plant. AMAZING! Ready for the video? Now be nice! This is our first one! 

Isn't that amazing! 


Disclosure: I am Amazon Affiliate and may receive a small compensation for including links on my blog. Buying through my links is not necessary, just appreciated. Amazon does not charge extra for linked items recommended by their affiliates.  I only recommend products that I use and trust OR plan on using in the future. Please buy responsibly and do your own product research before buying anything online. 

Tuesday, June 17, 2014

Avocados Everywhere!

This post contains no affiliate links.
    
     One thing my family agrees upon food wise, is avocados! LOVE LOVE LOVE avocados! When I lived in Cali, we had lots of friends that had trees in their back yards. Where I live now.. umm... no one! For years my daughter has taken pits from the avocados we have eaten and buried them in our yard and in the flower pots. Nothing has ever grown. I just figured it was a lost cause. A member of a homesteading/homeschool FB group I am in, posted pictures of her avocado plant she grew this year. What??
     In years past, my little avocado seed would sit in the bathroom window and we would wait a couple of weeks to see what would happen. In about a month, I would get tired of looking at it and throw it out. After asking a ton of questions to the lady that CAN get an avocado to grow, I realized we were giving up way too soon! So we tried again! In about 2 months we got this...


Horrible, horrible picture but you get the point!

     We were so delighted, we decided to try another! We also did some researching and discovered it is possible to grow an avocado tree from a seed. It may or may not produce fruit, and it could take up to 20 years to produce any, but my daughter and I figure it is worth a shot! I wish I had started one 10 years ago and stuck with it! Maybe we would have some fruit by now! 

     The plant on the left is the one we started 3 months ago. 
There are several roots but it has not developed a stem yet. 
Last week, we were looking at one of our container pots my daughter planted seeds in to grow flowers. She turned to me and said. 'Mom, this one does not look like the other flowers, it looks more like a tree!' 


Guess what that is? It is one of the pits she planted MONTHS ago! 
And, YES I am sure! We dug it up to see what it was!

Tonight, I went out to the garden and was looking at my poor heat stroked peas and I found this growing in our compost container bin we made to grow in! 


      At least we know we can make an avocado plant! If all goes well, we should have 4 plants on our mini homestead! Check back with me in 10 years to see if we have fruit! ;)


Here is some info on growing your own avocado tree! (I am in no way affiliated with any of these pages.)
http://homeguides.sfgate.com/make-avocado-tree-bear-fruit-44718.html

http://forums.gardenweb.com/forums/load/tropicalfruits/msg0722004618510.html

http://www.ehow.com/way_5569480_long-avocado-tree-produce.html

Disclosure: This post contains no affiliate links, However, I am Amazon Affiliate and may receive a small compensation for including links on my blog. Buying through my links is not necessary, just appreciated. Amazon does not charge extra for linked items recommended by their affiliates.  I only recommend products that I use and trust OR plan on using in the future. Please buy responsibly and do your own product research before buying anything online. 

Friday, June 13, 2014

Edible Landscape

This post contains no affiliate links. 


     I've been seeing a lot of posts about 'Grow Gardens, Not Lawns.' This year I decided I would try my hand at it. I have ran into a few problems, but all in all, I am pleased. I chose a couple of beds that were already in my yard and planted herbs and veggies. 

     This one only worked out 1/2 okay. Originally, we planted dill on one side of our peach tree and carrots and spinach on the other. A little gopher/mole type thing decided we had planted it for him, and ate all of the spinach and carrots. (Insert sad face here) He never touched the dill and drowned in a bowl of water about a week later. Too late for our poor carrots and spinach. I can't wait to harvest my dill and then I will try again with the lettuce and spinach for the cooler months. Not sure if I will ever try carrots again though.. I've never had any luck. 

     This is as much of our container gardening/recycle project just as much as edible landscape. I found an old tractor rim with the center cut out at my mom's house that was abandoned by my brother in law. I loved finding it! It was pretty heavy but I managed to get it in the back of my truck all by myself. My daughter and I planted a few sweet onions, lettuce and wild onions in it. Then after the gopher/mole thing ate my other spinach, we planted spinach in it as well. The lettuce has done better here than anywhere else, but the spinach, not too well. There is also a redbud tree growing in it. It is a temporary home till we decide where we want to put it. Might not be too bad there though. 


     In our front yard we have a 'mystery' plant growing! It is a mystery because my seedlings got dumped over and mixed up before they were able to be planted. The leaves and blooms are huge but the fruit is not producing well. The only ones that even started to grow died out before I could tell what they were. I thought it was zucchini but the fruit looked like little round balls. This is the area of the front yard that scored very high in our 'Soil Sample' project. Maybe it just needs some more time. There has also been a lack of bees in our yard this year, even with the flowering privet trees. Could that be why the flowers are not forming fruit? Also in the photo are my little flower pots with cilantro, spinach and lettuce in them. 

     There is another bed around a tree that I started asparagus in but it a new growth and photos do not turn out well. The plant is thin a wispy looking. Hard to see what you are looking at.   


   Well, that concludes my edible landscape. I know it is not much, but its a start. I love this idea along with container gardening. However, I am determined NOT to buy any containers to grow in. Recycle, Reuse, Re-purpose is our motto!  I would love to hear about and see your edible landscape! One day, I hope to have so many containers, my place looks like this :) 


Disclosure: This post contains no affiliate links, however, I am Amazon Affiliate and may receive a small compensation for including links on my blog. Buying through my links is not necessary, just appreciated. Amazon does not charge extra for linked items recommended by their affiliates.  I only recommend products that I use and trust OR plan on using in the future. Please buy responsibly and do your own product research before buying anything online. 

Thursday, June 12, 2014

Experimenting with Soil

This post contains no affiliate links.


   One of the best FREE curriculum I have found for gardening is Nutrients4life.  After watching video #2 Properties Of Soil we were inspired to do our own soil testing to find where would be the best spot for our garden in the spring. 

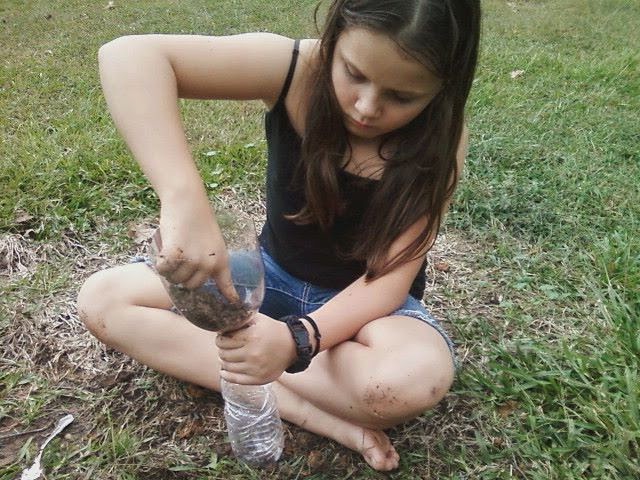
     We started by choosing the top 5 spots on our property we were thought a garden would do well. After going over the 5 things a plant needs (soil, water, air, sun, room to grow), she dug holes as far down as she could go, putting a bit of the soil in a recycled plastic bottle. We went on to the next spot until all 5 bottles were filled. Next she added water to the bottles and shook them up. We guestimated which ones we thought would make the best garden. Then we let the bottles settle over night. We looked at the results and made observations at the contents of each bottle. Unfortunately, we discovered the best soil in on our property is in the worst spot! The front yard had the best mix of soil, sand and organic material. However, there is limited space for a large garden and daddy had already said he did not want to step over a bunch of plants and have to weed eat around them. Then we discovered the most optimal location with the best sun, water source and space has very clay like soil and would not make a very good garden. In the end, decided out by the creek would be our best location because it had good soil, air, sun and plenty of room to grow! We would just have to get another hose to extend the reach of the water source. Here are the photos of my daughter collecting the soil samples.


 First we needed a funnel to help get the soil into our recycled water bottles.


 She dug up soil from the first area and put it into a bottle.


 Soil sample #1 complete!


  A few more areas and a few more samples and we were finished! 

TaDa!

Our completed soil samples after they had set overnight!
I bet you can tell which one has the greatest soil in it! 


Love this idea?
for FREE downloadable curriculum, videos and lesson plans 
for elementary students all the way to highschool! 

Want to just see the video that inspired us? 


     Disclaimer- I am in no way affiliated with Nutrients4life.org and I was not paid or asked to advertise for them. This is just our account of how we were inspired to do our own science experiment! However, I am Amazon Affiliate and may receive a small compensation for including links on my blog. Buying through my links is not necessary, just appreciated. Amazon does not charge extra for linked items recommended by their affiliates.  I only recommend products that I use and trust OR plan on using in the future. Please buy responsibly and do your own product research before buying anything online.